
![Python 3.7 のインストール [Windows 10]](https://jade.alt-area.jp/wp-content/uploads/2018/06/WS000006.jpg)

目次
はじめに
Django を学習するには、何はともあれ公式チュートリアル「はじめての Django アプリ作成」からスタートしてみるのが良いでしょう。しかし、いざチュートリアル通りに進めようとしても躓く場合も多いと思います。そこで、「チュートリアルの進め方」シリーズとして、チュートリアルに沿った作業を行いながら補足事項をまとめることにしました。チュートリアルで躓いた際のヒントとしてお使いください。
利用環境は Ubuntu、 Linux Mint を中心として説明しますが、 Windows についても補足します。
前回は、Django チュートリアルの進め方 その1 と題して はじめての Django アプリ作成、その 1 についてまとめました。
今回は、はじめての Django アプリ作成、その 2 の前半についてまとめました。
Database の設定
ここでは、チュートリアルと同じ SQLite3 を使って設定することにします。
運用上は PostgreSQL や MySQL を利用する事が多いと思いますが、それぞれの DB 毎に注意事項等があり、チュートリアルを進める上では SQLite3 を使うのが無難です。 (PostgreSQL、 MySQL、 SQLServer 等の接続例については、後々記事にする予定です。)
それでは、SQLite3 を前提として mysite/settigns.py を設定していきます。
DATABASES = {
    'default': {
        'ENGINE': 'django.db.backends.sqlite3',
        'NAME': os.path.join(BASE_DIR, 'db.sqlite3'),
    }
}
この部分を接続条件に従って書き換えます。今回はデフォルトのままで使います。
'ENGINE' を見ると、SQLite3 を使っているのが確認できます。
'NAME' は DB 名です。 SQLite はファイルベースなので、該当するファイル名へのパスを設定します。ここでは、プロジェクト直下 (manage.py のあるフォルダ) の db.sqlite3 というファイルを指すように os.path.join を使って設定されています。
パスとして BASE_DIR を付加していますが、この値はプロジェクト直下 (manage.py のあるフォルダ) を指すように、 settings.py の最初の方で設定されています。
# Build paths inside the project like this: os.path.join(BASE_DIR, ...)
BASE_DIR = os.path.dirname(os.path.dirname(os.path.abspath(__file__)))
TIME_ZONE を設定します。
# Internationalization
# https://docs.djangoproject.com/en/2.1/topics/i18n/

LANGUAGE_CODE = 'ja-jp'

TIME_ZONE = 'Asia/Tokyo'

USE_I18N = True

USE_L10N = True

USE_TZ = True
LANGUAGE_CODE と TIME_ZONE を日本に設定しました。
INSTALLED_APPS の設定状況を確認します。
INSTALLED_APPS = [
    'django.contrib.admin',
    'django.contrib.auth',
    'django.contrib.contenttypes',
    'django.contrib.sessions',
    'django.contrib.messages',
    'django.contrib.staticfiles',
]
予めこれらのアプリケーションがインストールされているため、データベースを初期化しておく必要があります。 (SQLite 以外の DB を使う場合は、予め DB を作成しておいてください。)
manage.py migrate コマンドを実行します。
$ python manage.py migrate
Operations to perform:
  Apply all migrations: admin, auth, contenttypes, sessions
Running migrations:
  Applying contenttypes.0001_initial... OK
  Applying auth.0001_initial... OK
  Applying admin.0001_initial... OK
  Applying admin.0002_logentry_remove_auto_add... OK
  Applying admin.0003_logentry_add_action_flag_choices... OK
  Applying contenttypes.0002_remove_content_type_name... OK
  Applying auth.0002_alter_permission_name_max_length... OK
  Applying auth.0003_alter_user_email_max_length... OK
  Applying auth.0004_alter_user_username_opts... OK
  Applying auth.0005_alter_user_last_login_null... OK
  Applying auth.0006_require_contenttypes_0002... OK
  Applying auth.0007_alter_validators_add_error_messages... OK
  Applying auth.0008_alter_user_username_max_length... OK
  Applying auth.0009_alter_user_last_name_max_length... OK
  Applying sessions.0001_initial... OK
下記のように、テーブルが作成されています。
$ sqlite3 db.sqlite3
sqlite> .table
auth_group                  auth_user_user_permissions
auth_group_permissions      django_admin_log
auth_permission             django_content_type
auth_user                   django_migrations
auth_user_groups            django_session
モデルの作成
Django の「モデル」は、DB のテーブル定義に相当する Python コードです。具体的には django.db.Model を継承したクラスとして定義されています。

まず polls にモデルを追加します。
from django.db import models


class Question(models.Model):
    question_text = models.CharField(max_length=200)
    pub_date = models.DateTimeField('date published')


class Choice(models.Model):
    question = models.ForeignKey(Question, on_delete=models.CASCADE)
    choice_text = models.CharField(max_length=200)
    votes = models.IntegerField(default=0)
Question (質問) と Choice (回答) という2つのモデルを定義しています。テーブルのフィールドは Field クラスを使って定義します。
auto_now_add: オブジェクトが最初に作成されるとき、自動的にフィールドに現在の日時をセットする
Choice と Question は 多対 1 の関係になっており、Choice の question を介して 2つのモデルが関連付けられています。

polls アプリケーションを settings.py に登録します。
INSTALLED_APPS = [
    'polls.apps.PollsConfig',
    'django.contrib.admin',
    'django.contrib.auth',
    'django.contrib.contenttypes',
    'django.contrib.sessions',
    'django.contrib.messages',
    'django.contrib.staticfiles',
]
manage.py makemigrations を実行してマイグレーションを作成します。
$ python manage.py makemigrations polls
Migrations for 'polls':
  polls/migrations/0001_initial.py
    - Create model Choice
    - Create model Question
    - Add field question to choice
polls/migrations/0001_initial.py が作成されます。ここにモデルの作成や変更の内容が記述されています。
manage.py migrate を実行すると、このファイルに記述された内容に従って SQL 文が生成されて実行されます。生成される SQL 文を確認することのできるコマンドが manage.py sqlmigrate です。
django-admin sqlmigrate app_label migration_name
app_label: アプリケーション名
migration_name: マイグレーション名(マイグレーションファイルの冒頭に付された番号)
manage.py sqlmigrate を実行してみます。
$ python manage.py sqlmigrate polls 0001
BEGIN;
--
-- Create model Choice
--
CREATE TABLE "polls_choice" ("id" integer NOT NULL PRIMARY KEY AUTOINCREMENT, "choice_text" varchar(200) NOT NULL, "votes" integer NOT NULL);
--
-- Create model Question
--
CREATE TABLE "polls_question" ("id" integer NOT NULL PRIMARY KEY AUTOINCREMENT, "question_text" varchar(200) NOT NULL, "pub_date" datetime NOT NULL);
--
-- Add field question to choice
--
ALTER TABLE "polls_choice" RENAME TO "polls_choice__old";
CREATE TABLE "polls_choice" ("id" integer NOT NULL PRIMARY KEY AUTOINCREMENT, "choice_text" varchar(200) NOT NULL, "votes" integer NOT NULL, "question_id" integer NOT NULL REFERENCES "polls_question" ("id") DEFERRABLE INITIALLY DEFERRED);
INSERT INTO "polls_choice" ("id", "choice_text", "votes", "question_id") SELECT "id", "choice_text", "votes", NULL FROM "polls_choice__old";
DROP TABLE "polls_choice__old";
CREATE INDEX "polls_choice_question_id_c5b4b260" ON "polls_choice" ("question_id");
COMMIT;
マイグレーションを実行します。
$ python manage.py migrate
Operations to perform:
  Apply all migrations: admin, auth, contenttypes, polls, sessions
Running migrations:
  Applying polls.0001_initial... OK
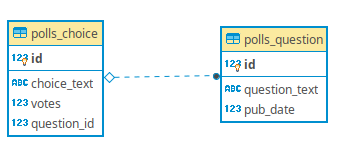
polls_question, polls_choice の2つのテーブルが作成されました。
sqlite> .table
auth_group                  django_admin_log
auth_group_permissions      django_content_type
auth_permission             django_migrations
auth_user                   django_session
auth_user_groups            polls_choice
auth_user_user_permissions  polls_question
次回は、Django チュートリアルの進め方 その 2 (2) です。
参考
-
- Django チュートリアルの進め方 その 1
- Django チュートリアルの進め方 その 2 (1)
- Django チュートリアルの進め方 その 2 (2)
- Django チュートリアルの進め方 その 2 (3)
- Django チュートリアルの進め方 その 3 (1)
- Django チュートリアルの進め方 その 3 (2)
- Django チュートリアルの進め方 その 4 (1)
- Django チュートリアルの進め方 その 4 (2)
- Django チュートリアルの進め方 その 5 (1)
- Django チュートリアルの進め方 その 5 (2)
- Django チュートリアルの進め方 その 6
- Django チュートリアルの進め方 その 7


