

![MySQL 5.7 で sudo 無し root ログイン [Ubuntu]](https://jade.alt-area.jp/wp-content/uploads/2018/05/cbb968236bf2404dc2d2714bbcaba0e9_s.jpg)


目次
はじめに
Django を学習するには、何はともあれ公式チュートリアル「はじめての Django アプリ作成」からスタートしてみるのが良いでしょう。しかし、いざチュートリアル通りに進めようとしても躓く場合も多いと思います。そこで、「チュートリアルの進め方」シリーズとして、チュートリアルに沿った作業を行いながら補足事項をまとめることにしました。チュートリアルで躓いた際のヒントとしてお使いください。
利用環境は Ubuntu、 Linux Mint を中心として説明しますが、 Windows についても補足します。
前回は、Django チュートリアルの進め方 その 5 (1) と題してはじめての Django アプリ作成、その 5の前半についてまとめました。
今回は、はじめての Django アプリ作成、その 5 の後半についてまとめました。
ビューをテストする
Django テストクライアント
シェルを開いてテスト環境をセットアップします。(setup_test_environment() の実行)
>>> from django.test.utils import setup_test_environment
>>> setup_test_environment()
次に、テストクライアントを作成します。
>>> from django.test import Client
>>> client = Client()
まず、ルート (http://localhost:8000/) にアクセスしてみます。
ブラウザでは下記のような画面になります。
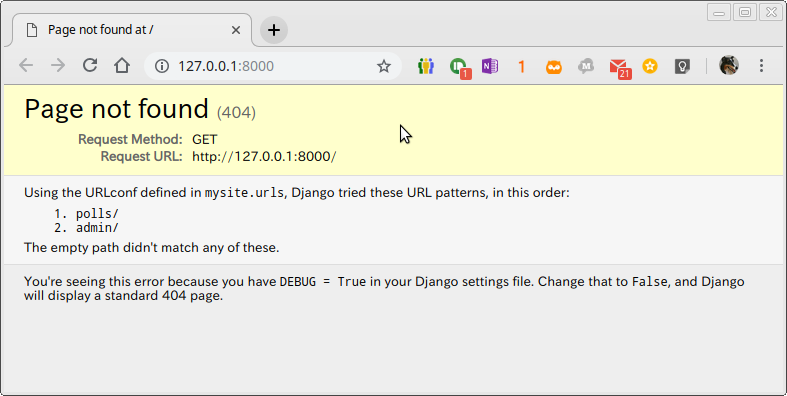
404 エラー (今回は正常動作) になります。
シェルからのアクセスは下記のようになります。
>>> response = client.get('/')
Not Found: /
>>> response.status_code
404
Not Found (404 エラーに相当) になります。
次に、polls/index にアクセスします。ブラウザの表示画面とシェルのコマンドは下記のとおりです。
shell 上ではアドレスをハードコードせずに、 reverse('polls:index') としてアクセスします。

>>> from django.urls import reverse
>>> response = client.get(reverse('polls:index'))
>>> response.status_code
200
ステータスコード200 = 成功です。
表示内容を確認します。
>>> response.content b'\n <ul>\n \n <li><a href="/polls/1/">What's up?</a></li>\n \n </ul>\n'
コンテキストの内容 (テンプレートに渡した変数) を確認します。
>>> response.context['latest_question_list']
<QuerySet [<Question: What's up?>]>
ビューを改良する
Polls.IndexVew が未来日付を公開しないように修正します。
from django.utils import timezone
from django.http import HttpResponseRedirect
from django.shortcuts import get_object_or_404, render
from django.urls import reverse
from django.views import generic
from django.db.models import F

from .models import Choice, Question


class IndexView(generic.ListView):
    template_name = 'polls/index.html'
    context_object_name = 'latest_question_list'

    def get_queryset(self):
        """
        Return the last five published questions (not including those set to be
        published in the future).
        """
        return Question.objects.filter(
            pub_date__lte=timezone.now()
        ).order_by('-pub_date')[:5]
.
.
新しいビューをテストする
pools/tests.py にビューのテストを作成していきます。
まず、reverse を使うための import文を書きます。
from django.urls import reverse
次に、question を生成しやすいように create_question() 関数を定義します。
def create_question(question_text, days):
    """
    Create a question with the given `question_text` and published the
    given number of `days` offset to now (negative for questions published
    in the past, positive for questions that have yet to be published).
    """
    time = timezone.now() + datetime.timedelta(days=days)
    return Question.objects.create(question_text=question_text, pub_date=time)
question_text を質問項目とし、今日から days 後に公開する Question オブジェクトを生成する関数です。

このショートカット関数を使って、Question を作成してテストを行う事ができます。
テストケース QuestionIndexViewTests に下記メソッドを定義していきます。
まず、Question が存在しない場合のテストです。
def test_no_questions(self):
    """
    If no questions exist, an appropriate message is displayed.
    """
    response = self.client.get(reverse('polls:index'))
    self.assertEqual(response.status_code, 200)
    self.assertContains(response, "No polls are available.")
    self.assertQuerysetEqual(response.context['latest_question_list'], [])
Responseインスタンスが指定されたstatus_codeを生成し、text がレスポンスのコンテンツに含まれることを示す。
TransactionTestCase.assertQuerysetEqual(qs, values, transform=repr, ordered=True, msg=None)
クエリセット qs が values のリストを返す事を示す。
次に過去 Question のテストです。
def test_past_question(self):
    """
    Questions with a pub_date in the past are displayed on the
    index page.
    """
    create_question(question_text="Past question.", days=-30)
    response = self.client.get(reverse('polls:index'))
    self.assertQuerysetEqual(
        response.context['latest_question_list'],
        ['<Question: Past question.>']
    )
未来の Question のテストも同様です。
def test_future_question(self):
    """
    Questions with a pub_date in the future aren't displayed on
    the index page.
    """
    create_question(question_text="Future question.", days=30)
    response = self.client.get(reverse('polls:index'))
    self.assertContains(response, "No polls are available.")
    self.assertQuerysetEqual(response.context['latest_question_list'], [])
未来の質問と過去の質問が共存する場合もテストします。
def test_future_question_and_past_question(self):
    """
    Even if both past and future questions exist, only past questions
    are displayed.
    """
    create_question(question_text="Past question.", days=-30)
    create_question(question_text="Future question.", days=30)
    response = self.client.get(reverse('polls:index'))
    self.assertQuerysetEqual(
        response.context['latest_question_list'],
        ['<Question: Past question.>']
    )
過去の質問だけが2つある場合をテストします。
def test_two_past_questions(self):
    """
    The questions index page may display multiple questions.
    """
    create_question(question_text="Past question 1.", days=-30)
    create_question(question_text="Past question 2.", days=-5)
    response = self.client.get(reverse('polls:index'))
    self.assertQuerysetEqual(
        response.context['latest_question_list'],
        ['<Question: Past question 2.>', '<Question: Past question 1.>']
    )
DetailView のテスト
DetailView も未来日付を表示しないようにします。DetailView にも get_queryset() メソッドを定義してクエリセットを制限します。
class DetailView(generic.DetailView):
    model = Question
    template_name = 'polls/detail.html'

    def get_queryset(self):
        """
        Excludes any questions that aren't published yet.
        """
        return Question.objects.filter(pub_date__lte=timezone.now())
DetailView のテストを追加します。
class QuestionDetailViewTests(TestCase):
    def test_future_question(self):
        """
        The detail view of a question with a pub_date in the future
        returns a 404 not found.
        """
        future_question = create_question(question_text='Future question.', days=5)
        url = reverse('polls:detail', args=(future_question.id,))
        response = self.client.get(url)
        self.assertEqual(response.status_code, 404)

    def test_past_question(self):
        """
        The detail view of a question with a pub_date in the past
        displays the question's text.
        """
        past_question = create_question(question_text='Past Question.', days=-5)
        url = reverse('polls:detail', args=(past_question.id,))
        response = self.client.get(url)
        self.assertContains(response, past_question.question_text)
参考
-
- Django チュートリアルの進め方 その 1
- Django チュートリアルの進め方 その 2 (1)
- Django チュートリアルの進め方 その 2 (2)
- Django チュートリアルの進め方 その 2 (3)
- Django チュートリアルの進め方 その 3 (1)
- Django チュートリアルの進め方 その 3 (2)
- Django チュートリアルの進め方 その 4 (1)
- Django チュートリアルの進め方 その 4 (2)
- Django チュートリアルの進め方 その 5 (1)
- Django チュートリアルの進め方 その 5 (2)
- Django チュートリアルの進め方 その 6
- Django チュートリアルの進め方 その 7


![DbContext が見つからない [C# Visual Studio 2017]](https://jade.alt-area.jp/wp-content/uploads/2018/09/nuget_install_2-150x150.png)
